

The Mk III Teaching Station
I wrote about my first teaching station nine months ago. That, however, was just the start.
Behold the Mk III!
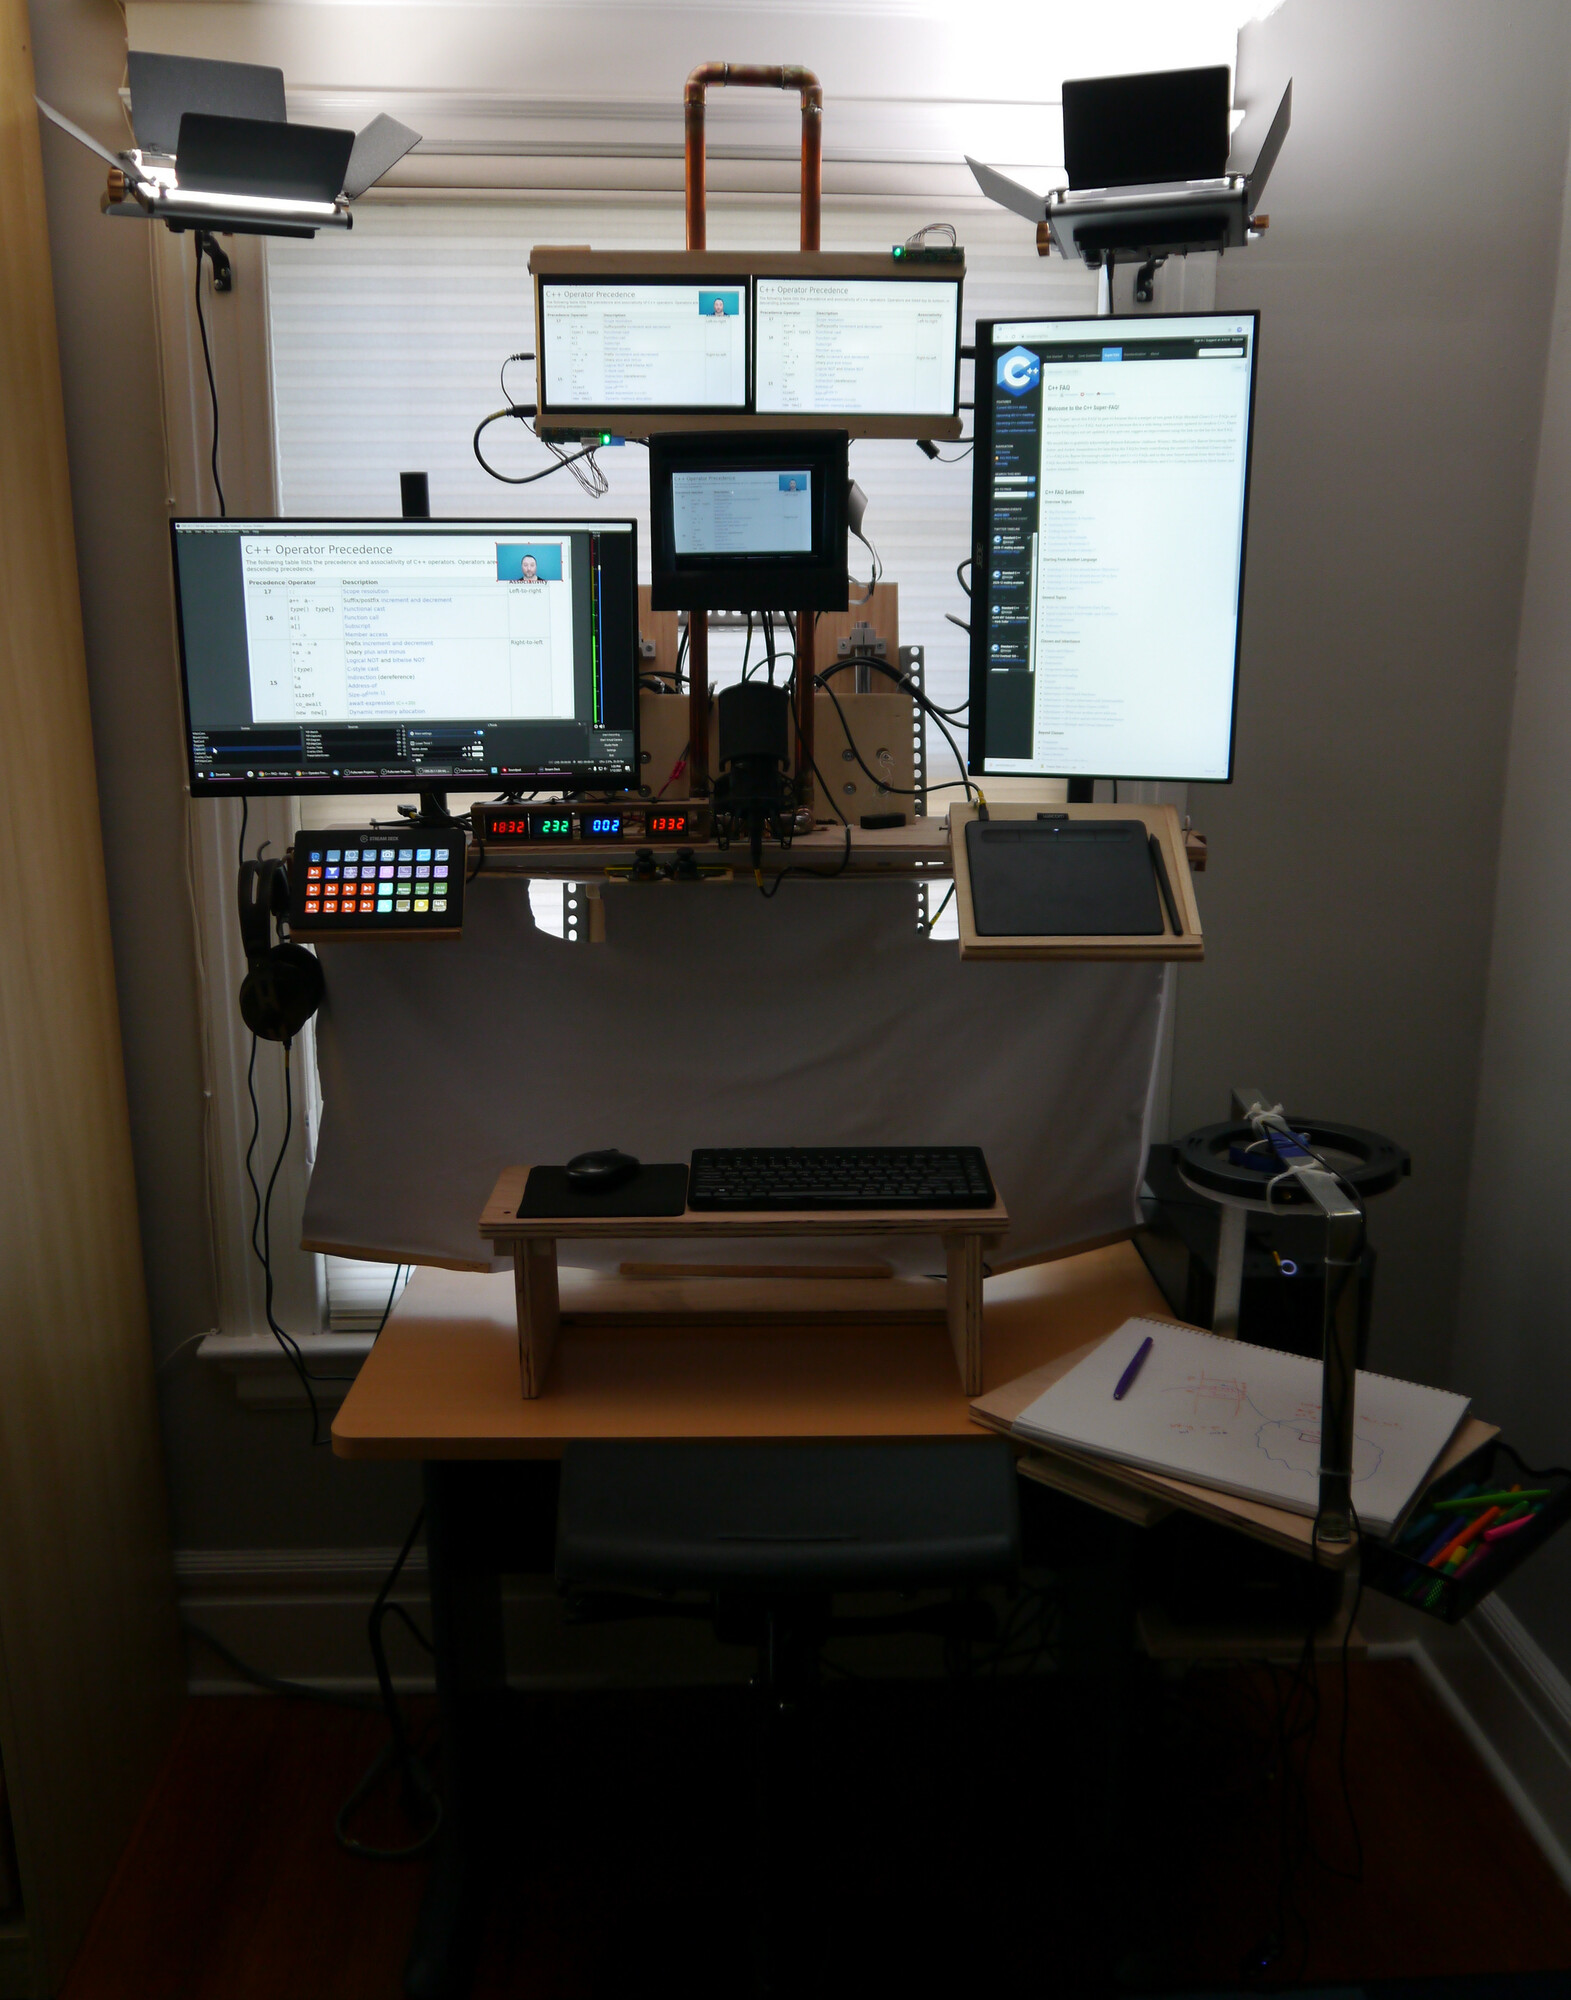
Mk III Teaching Station (Raised)
This is a substantially more advanced station than the Mk I. It has been used, in whatever stage of evolution was current, for the last eight months. Some of the features have been tweaked and tested over that time, and others are still being developed. This post gives an overview of the additions and changes to the original. I estimate the benefit, the cost (in USD), and the amount of work to add the feature, and provide a short description. Details for some items are in separate posts.
Mk III Teaching Station (Lowered)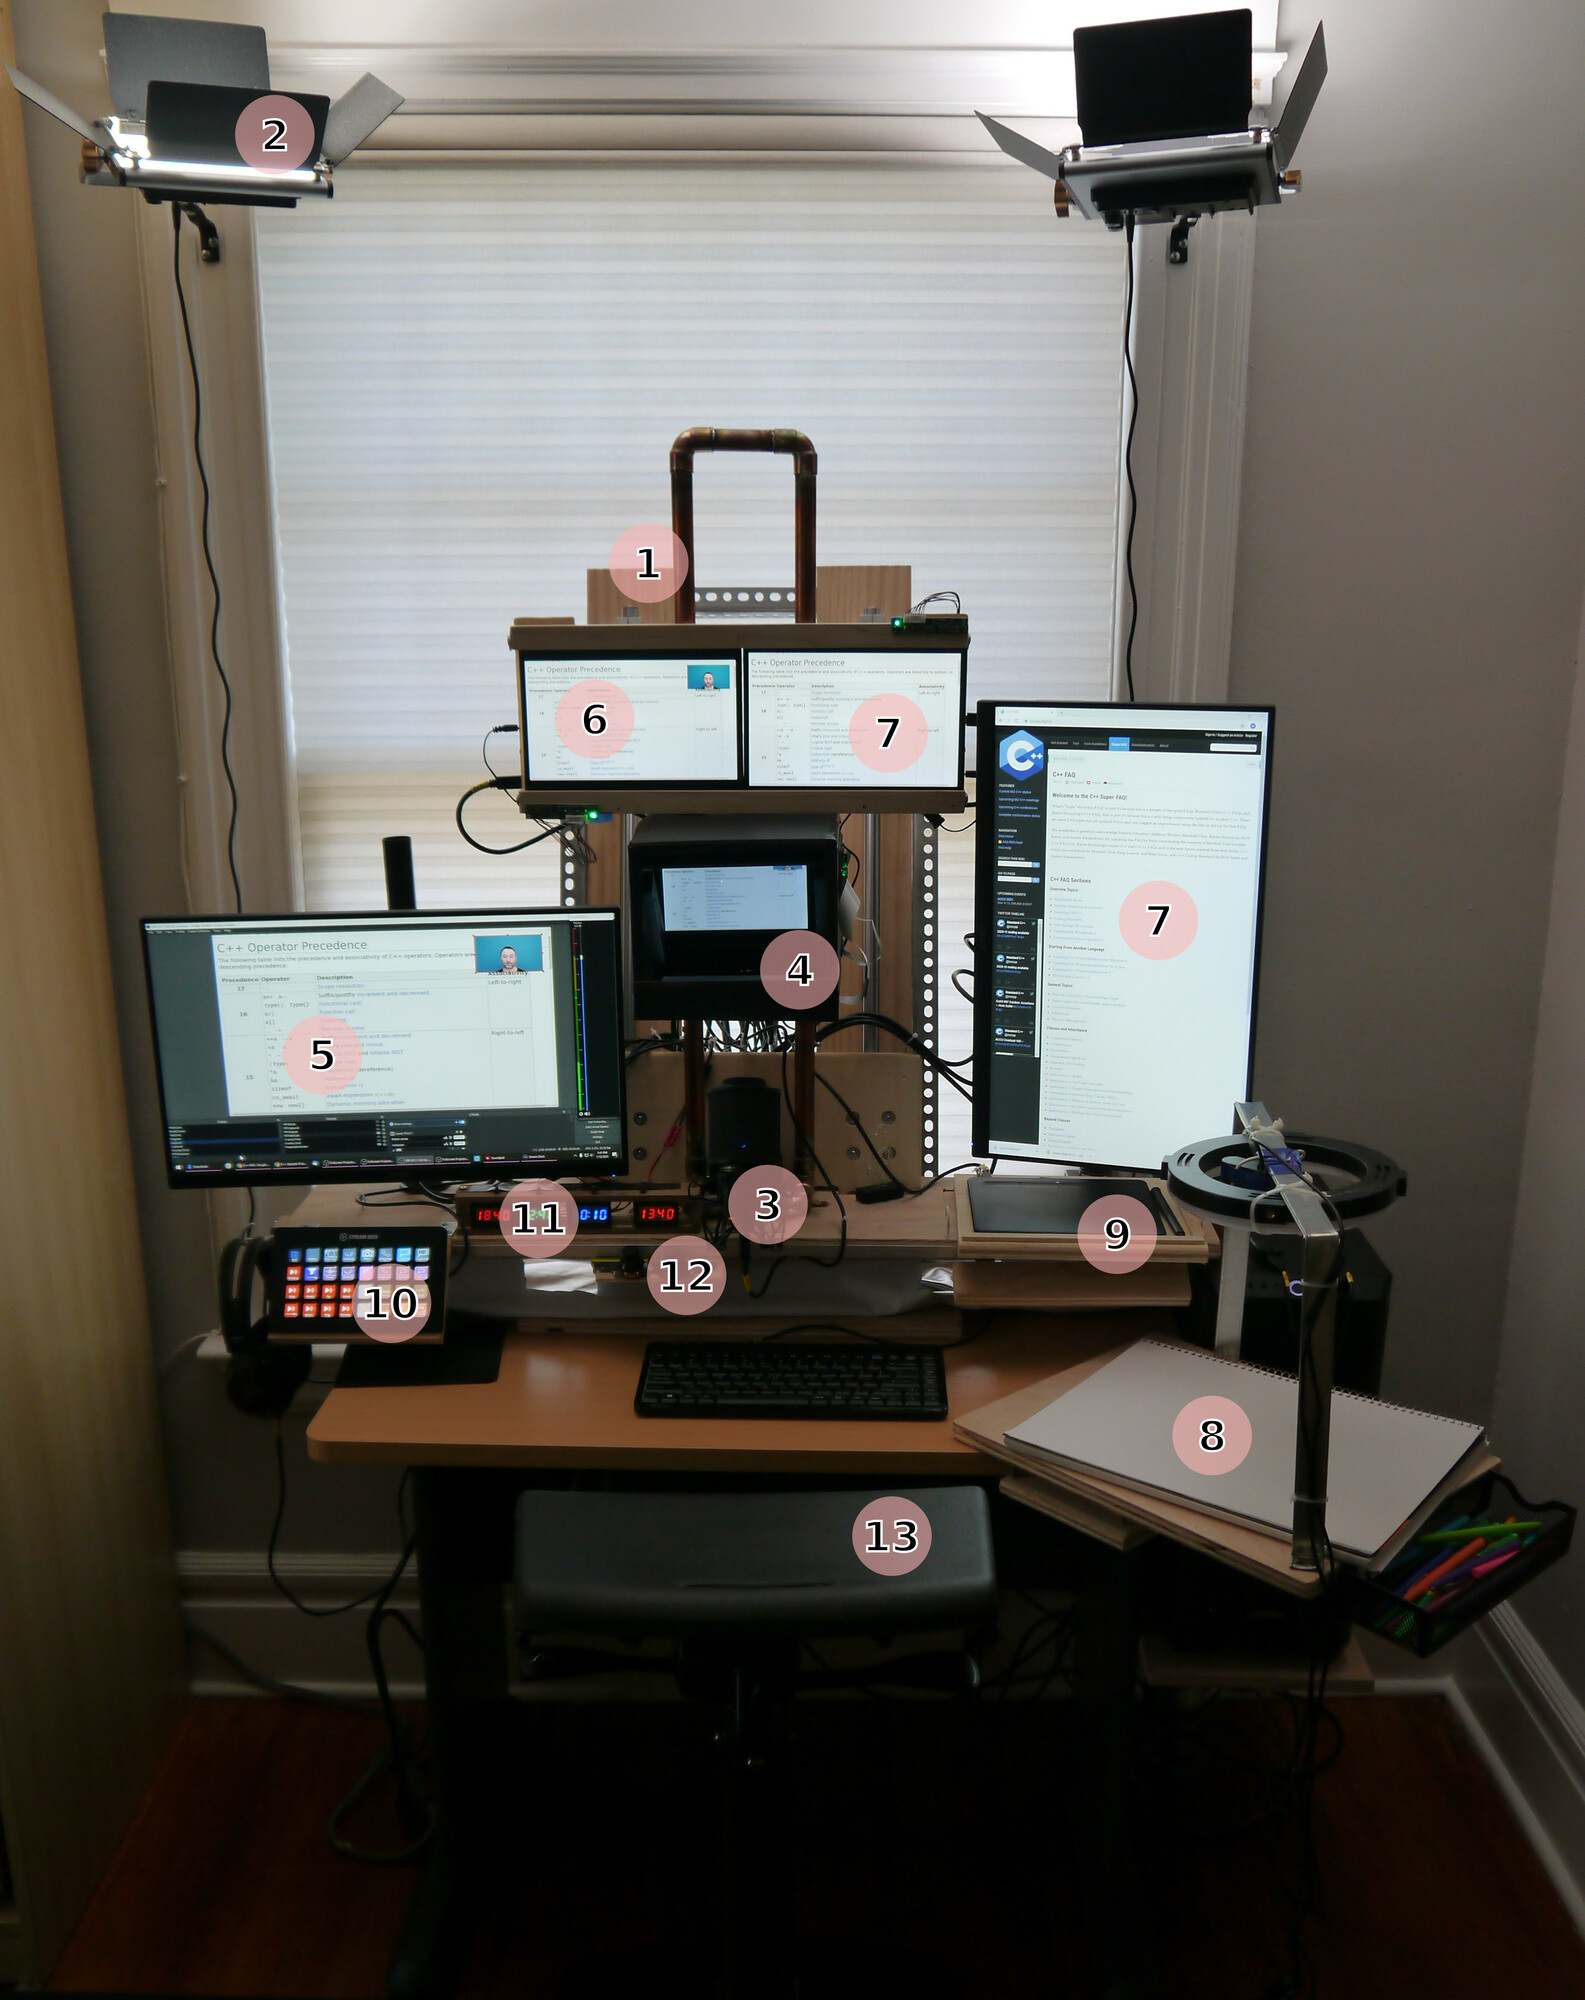
- Custom sit/stand desk
- Video lighting kit
- Shock mounted microphone
- Teleprompter monitor
- ‘Safe’ (never broadcast) monitor
- Output monitor
- Presentation monitors
- Physical diagram area
- Digital diagram tablet
- Stream Deck
- World clocks
- Floating camera controls
- Standing chair
Some things of interest not visible in the photo:
(1) Custom Sit/Stand Desk
Cost: $300 Benefit: Medium Work: Three days, woodworking tools and space needed I’ll admit, it doesn’t win any awards for style, but it meets the criteria of a standing desk for instructional use:
- the extension must be long enough so that the camera goes from eye height when sitting to eye height when standing,
- it must be able to support the weight of the monitors and other equipment,
- and it must be able to change from sitting to standing rapidly.
I looked to find an off-the-shelf standing desk that met these criteria, but failed. So, I built my own. Click for more details and construction information.
(2) Video Lighting Kit
Cost: $200 Benefit: High Work: Two hours to mount The original station was entirely lit by natural light. That worked for the most part until a storm darkened the room, or I needed to present additional sessions in the evening. Good lighting with a cheap webcam is probably better than bad lighting with a good webcam.
(3) Shock Mounted Microphone
Cost: $200 ($170 Microphone, $30 Mount) Benefit: High Work: Minimal This is a minor change to the original station, but quality audio is still one of the most important considerations. Previously, the microphone was hanging from the ceiling to avoid vibrations. I needed the microphone to move with desk, so it got attached to the shelf with its shock mount (photo).
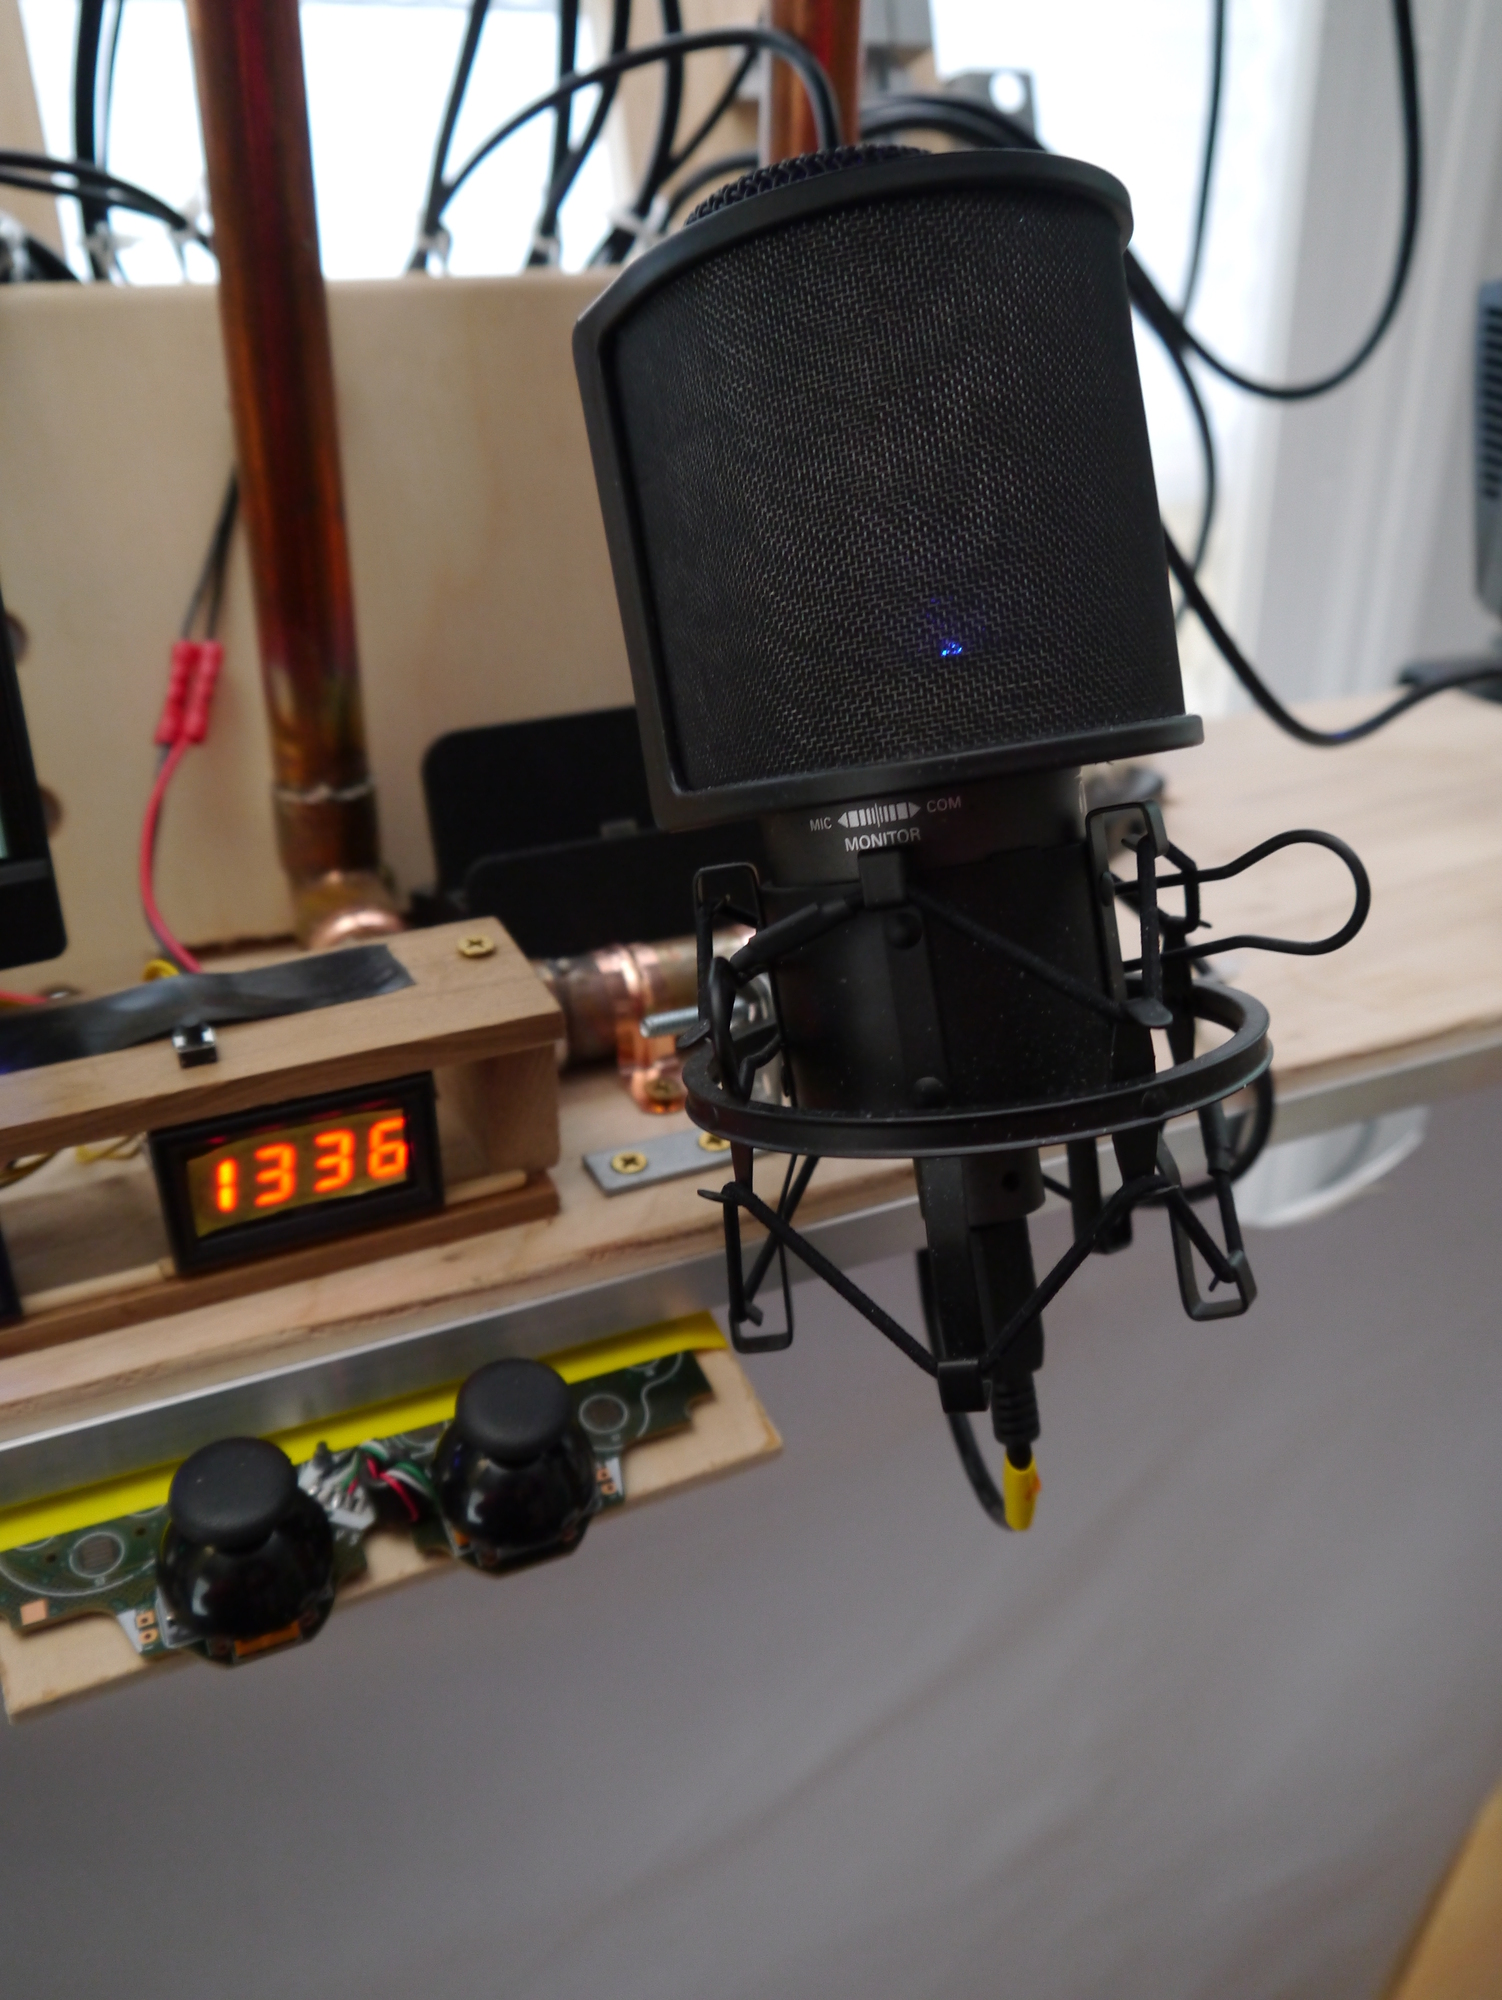
(4) Teleprompter
Cost: $300 ($170 StreamCam, $75 LED display, $40 two-way-mirror, plus wood) Benefit: Very High Work: A day. Tools might help, case could be cardboard rather than wood Inside this box is a small screen, a camera, and a two-way mirror. This little box dramatically improves the training experience for both instructor and attendee. In video conferences, I can get as close as possible to making eye contact, and when teaching, I can be looking at attendees while seeing the material I am delivering. I don’t want to give up this piece of kit! Click for more information and build details.
(5) Safe Monitor
Cost: $160 Monitor, $30 Stand Benefit: Medium Work: Minimal The first iteration of the teaching station had just two monitors. There are now five, and this one is the designated ‘safe’ monitor; it is never captured or shared. Anything not to be broadcast should be on this screen as far as possible. Some of the windows that appear on this screen are still captured but not the screen itself. Video conferencing software, such as Zoom, appear here as well. A separate displays posting provides more details.
(6) Output Monitor
Cost: $95 Benefit: High Work: Minimal, or half a day if you buy a separate panel. This monitor shows the current output. It is not used for any other purpose. It may seem wasteful to dedicate a whole monitor to output monitoring, but remote teaching can deprive an instructor of attendees’ feedback. If I am ever uncertain about what is being sent, then I can look here, always.
What might not be clear in the photo is that this isn’t a regular monitor. I wanted something smaller than most monitors and lighter. I bought just the monitor panel and mounted it myself. A separate displays posting provides more details.
(7) Presentation Monitors
Cost: $95 Small Monitor, $160 Large Monitor, $30 Stand Benefit: High Work: Minimal, or half a day if you buy a separate panel. There are two presentation monitors. The smaller monitor (although it is still set to the same resolution as all monitors - 1920x1080) is used for slide decks. The whole screen is captured. The larger monitor is used for remoting to a client’s machines. Only part of the screen is captured, e.g. a Unix shell. This leaves an area that is relatively safe on this screen for other client-specific tasks, e.g. checking email, answering chat questions, etc. A separate displays posting provides more details.
(8) Physical Diagram Area
Cost: $100 ($60 Manual Focus Webcam, $30 USB Ring Light) Benefit: Medium Work: Half a day, tools definitely helped The physical diagram area is an attendee favourite. A camera faces down to a sketch pad, and there are some thick, bright coloured felt-pens for drawing. I think the low tech, physical nature is almost a relief to attendees tired of digital image after digital image. Click for more diagramming details.
(9) Digital Diagram Tablet
Cost: $80 Benefit: Medium Work: Minimal, although the fixing shown would take a couple of hours There is a digital tablet for drawing digital sketches. I have it. I made a nice little drop-down shelf for it. I seldom use it. When I do use it, I capture the AutoDesk SketchBook window. Click for more diagramming details.
It’s probably essential that you have some solution for drawing diagrams, but not that you have both. Also, there is another kind of drawing that might meet your needs. We’ll consider that when looking at highlighting and annotation software.
(10) Stream Deck
Cost: $290 (for the XL, as shown) Benefit: Very High Work: Minimal to install, probably a day or two to finally get things set up, add a couple of hours if mounting as shown Through the Stream Deck I control the video output, screen highlighting software, playing sounds to the attendees, my view in the teleprompter, etc. It’s high benefit rating earned by how much smoother it makes training. Click for more benefits and setup details.
(11) World Clocks
Cost: $6 Each, plus $9 for a PSU Benefit: Low Work: Half a day, you might not even need a soldering iron The world clocks (photo) allow me to quickly see the time in other training regions. One training programme I work on runs in four different time zones concurrently. Although I normally only teach in one at a time, I might be talking or scheduling meetings with instructors from any other zone. Well, there’s that, and they’re 7 segment displays positively channelling the eighties, almost as if you had a time machine built out of a DeLorean. I like the way it looks!
(12) Floating Camera Controls
Cost: $35 Benefit: Medium Work: A day The floating camera controls (photo) aren’t, alas, operational at the time of writing. It’s a Logitech F310 ripped from its case and the joysticks will, in the future control a ‘float cam’. The float cam is a movable picture-in-picture image from the main camera that can float around for things like code reviews. You can find out more about the float cam in the OBS posting.
(13) Standing Chair
Cost: $100 - $800 Benefit: Medium Work: Half an hour to build ‘Standing Chair’ was a phrase I assumed to be an oxymoron when I typed it into the search box. I knew the kind of thing I wanted, but surely it wasn’t actually a standing chair. Yes, it turns out that there are such things. And if you’re standing all day, especially if not teaching all day, they can be well worth it. I have the LeanRite Elite from Ergo impact. Not cheap, but a solid piece of kit. I provide more details in the post on creating the sit/stand desk.
Background Screen
Cost: $120 ($46 Plywood, $40 Chromagreen paint, $17 Scuff resist paint, $9 Primer) Benefit: High Work: Two days, but much of that is drying time I mostly use a plain background screen (photo), but it’s reversible to show its chroma green side. Click for more details.
OBS/XSplit
Cost: Free - $60/year Benefit: Very High Work: Half a day to get a basic set up ready, it can take many more hours to get it ready though! Open Broadcaster Software (OBS) OBS takes the different sources (main camera, diagram camera, presentation monitors, etc.) and assembles them into scenes. The scenes appear in virtual camera that can be fed into Zoom, or the like. You construct the views that your attendees would like to see. Click for more details
Screen Highlighting and Annotation
Cost: Free - $30 Benefit: High Work: Minimal I currently use Presentation Pointer as my screen highlighting software. It allows me to draw directly on the screen in an overlay and provide a halo for the pointer. It’s not the only option though: I have explored a few.
Soundpad
Cost: 5EUR Benefit: High Work: Minimal for a basic install, hours to pick your sounds Soundpad can play sounds through your microphone so that attendees can hear them. You can have a lot of fun here. For example, a ‘badum tsss’ from the drums for a joke, or the sound of crickets for another instructor’s joke. I have crowd noises on my main Stream Deck profile, but I can switch to a different profile containing many more samples. Click for more details on the benefits and set up.
Countdown Timer
Cost: Free Benefit: Low Work: An hour to set up OBS to read the file, and create and style the text box for the timer. OBS doesn’t come with a clock or timer built-in. I use a script for the clock, and My Stream Timer for countdown timers which are important while running labs. I cover more details in the OBS post.
Summary
The Mk III teaching station is more advanced than the original. Some of these are ideas from before the Mk I was built, and others are filling in newly discovered needs or as a result of suggestions from other instructors and course attendees.
If you are an instructor, I hope that this post includes some ideas or features you haven’t seen previously. I’d love to hear other suggestions or improvements.